Block development has a reputation for being harder than it needs to be. The official docs are thorough but long, and it’s easy to get lost before writing a single line of JavaScript. I’ve watched developers spend an entire afternoon trying to configure Webpack before giving up. This guide skips that problem entirely.
The short version: you don’t need to configure Webpack yourself anymore. @wordpress/scripts handles the build tooling, and block.json handles block registration. Most tutorials you’ll find predate this setup, which is why they feel more complicated than they should be. The current approach is genuinely simple once you see it.
What you need before starting
Node.js (v18 or above) and npm installed locally. A WordPress development environment — Local by Flywheel or WordPress Playground both work fine. That’s genuinely it. No Docker, no Vagrant, no custom Webpack config sitting in your project waiting to break on the next Node upgrade.
Scaffold the plugin
The fastest way to start is with @wordpress/create-block, which scaffolds everything — plugin file, block.json, JavaScript, PHP, CSS, and build config — in one command:
cd wp-content/plugins
npx @wordpress/create-block my-first-block --namespace myfirstblockThis creates a my-first-block/ folder with the following structure:
my-first-block/
├── my-first-block.php      # Plugin header + register_block_type call
├── package.json            # @wordpress/scripts dependency
├── src/
│   ├── block.json          # Block metadata (name, attributes, supports)
│   ├── edit.js             # Editor UI (what the author sees)
│   ├── save.js             # Front-end output (what visitors see)
│   ├── index.js            # Registers the block in JS
│   └── style.scss          # Front-end styles
└── build/ # Compiled output (generated, don't edit)Activate the plugin in WordPress, then start the dev server:
cd my-first-block
npm install
npm startFrom here, changes to files in src/ compile automatically. You’ll see the block appear in the editor under “Widgets” by default.
Understanding block.json
block.json is the single most important file to understand. It defines everything about the block — its name, what attributes it stores, what settings appear in the sidebar, and which JavaScript and CSS files to load. WordPress reads this file directly; you don’t register anything manually in PHP anymore.
{
  "$schema": "https://schemas.wp.org/trunk/block.json",
  "apiVersion": 3,
  "name": "myfirstblock/notice",
  "version": "1.0.0",
  "title": "Notice",
  "category": "text",
  "icon": "info",
  "description": "A simple notice block with a message and colour option.",
  "attributes": {
    "message": {
      "type": "string",
      "source": "html",
      "selector": "p"
    },
    "backgroundColor": {
      "type": "string",
      "default": "#f0f4ff"
    }
  },
  "supports": {
    "html": false,
    "align": true,
    "color": {
      "background": true,
      "text": true
    },
    "typography": {
      "fontSize": true
    }
  },
  "editorScript": "file:./index.js",
  "editorStyle": "file:./index.css",
  "style": "file:./style-index.css"
}A few things worth knowing here. The name field must be unique — namespace/block-name format, all lowercase. The attributes object defines what data the block stores and how it maps to the HTML output (the source field). The supports object controls which panel options appear in the editor sidebar — setting "html": false prevents users from switching to HTML view, which is good practice for blocks with structured output.
The edit function
edit.js controls what the block looks like inside the editor. It can be interactive — you can add controls, let users type directly into the block, pick colours. This is all React, but you don’t need to import React itself; WordPress makes it available globally.
import { useBlockProps, RichText, InspectorControls } from '@wordpress/block-editor';
import { PanelBody, ColorPicker } from '@wordpress/components';

export default function Edit( { attributes, setAttributes } ) {
	const { message, backgroundColor } = attributes;
	const blockProps = useBlockProps( {
		style: { backgroundColor },
	} );

	return (
		<>
			{ /* Sidebar panel */ }
			<inspectorcontrols>
				<panelbody title="Background colour" initialopen="{" true="" }="">
					 color="{" backgroundcolor="" }="" onchange="{" (="" value="" )=""> setAttributes( { backgroundColor: value } ) }
					/>
				colorpicker>panelbody>
			inspectorcontrols>

			{ /* Block canvas */ }
			<div {="" ...blockprops="" }="">
				<richtext tagname="p" value="{" message="" }="" onchange="{" (="" )=""> setAttributes( { message: value } ) }
					placeholder="Write your notice here..."
				/>
			richtext>div>

	);
}useBlockProps() is required — it attaches the data attributes and class names WordPress needs to identify the block in the editor. Always spread it onto your outermost element. RichText gives you an editable text field with basic formatting. InspectorControls renders into the right sidebar when the block is selected.
The save function
save.js produces the static HTML that gets stored in the database. It runs once when the post is saved, not on every page load. The output needs to be deterministic — given the same attributes, it must always produce the same HTML, otherwise WordPress will flag a “block validation error” when the post is edited later.
import { useBlockProps, RichText } from '@wordpress/block-editor';

export default function Save( { attributes } ) {
	const { message, backgroundColor } = attributes;
	const blockProps = useBlockProps.save( {
		style: { backgroundColor },
	} );

	return (
		<div {="" ...blockprops="" }="">
			<richtext.content tagname="p" value="{" message="" }="">
Notice the difference: in save.js you use useBlockProps.save() (not just useBlockProps()), and RichText.Content instead of RichText. These are the static versions. No event handlers, no state — just HTML output.
Registering the block in PHP
The main plugin file is short. register_block_type reads block.json and handles everything — you just point it at the build directory:
php
/**
 * Plugin Name: My First Block
 * Plugin URI:  https://kamalhosen.com
 * Description: A simple custom Gutenberg block.
 * Version:     1.0.0
 * Author:      Kamal Hosen
 * License:     GPL-2.0-or-later
 */

if ( ! defined( 'ABSPATH' ) ) {
    exit;
}

add_action( 'init', function() {
    register_block_type( __DIR__ . '/build' );
} );That’s the entire PHP side. register_block_type finds the block.json inside the build directory, registers the block, and enqueues the compiled scripts and styles automatically. No manual wp_enqueue_script() calls needed — the WordPress options and settings you defined in block.json handle everything.
Building for production
# Development (watch mode, unminified)
npm start

# Production (minified, optimised)
npm run buildAlways run npm run build before distributing or deploying your plugin. The build/ directory is what WordPress actually loads — commit it to your repository. The node_modules/ folder goes in .gitignore.
Adding a dynamic block (server-side rendering)
Static blocks store their HTML in the database. Dynamic blocks render on each page request using a PHP callback — useful when the output depends on live data, like a recent posts list or a product feed.
To make a block dynamic, set save.js to return null and add a render_callback in PHP:
// save.js — return null for dynamic blocks
export default function Save() {
    return null;
}add_action( 'init', function() {
register_block_type( __DIR__ . '/build', [
'render_callback' => 'myfirstblock_render_notice',
] );
} );
function myfirstblock_render_notice( array $attributes, string $content ): string {
$message = wp_kses_post( $attributes['message'] ?? '' );
$bg_color = sanitize_hex_color( $attributes['backgroundColor'] ?? '#f0f4ff' );
return sprintf(
'%s
',
esc_attr( $bg_color ),
$message
);
}Always sanitize attributes in the PHP render callback — treat them the same way you’d treat any user input. See the WordPress plugin security guide for which sanitization function to use for each data type.
Block validation errors — what they are and why they happen
This is the thing that catches everyone at least once. If you change save.js after a block has already been used in posts, WordPress throws a validation error when those posts are opened. The stored HTML no longer matches what save() produces, and WordPress refuses to render the block without intervention.
There are three ways to handle this. The cleanest is to use a dynamic block (PHP render) from the start — then save always returns null and there’s nothing to validate. The second option is block deprecations, where you define the old save function alongside the new one and WordPress migrates the content automatically. The third option is to just bump the block name — useful during development when you haven’t shipped to anyone yet.
For any block that stores user content, dynamic rendering is generally the right default. Static blocks are best for purely presentational elements where the output is unlikely to ever change.
Useful @wordpress packages to know
| Package | What it gives you |
|---|---|
@wordpress/block-editor | useBlockProps, RichText, InspectorControls, BlockControls, colour/alignment tools |
@wordpress/components | UI components: PanelBody, TextControl, ToggleControl, SelectControl, Button |
@wordpress/data | Access to the editor data store — current post, editor settings, selected block |
@wordpress/i18n | __( 'string', 'textdomain' ) for translations |
@wordpress/api-fetch | Fetch data from the WordPress REST API with nonce auth built in |
@wordpress/hooks | JavaScript version of WordPress actions and filters — addFilter, addAction |
All of these are pre-bundled with WordPress and available as globals — you import them but don’t bundle them, which is why block JavaScript files are small despite using a full component library.
Frequently asked questions
Do I need to know React to build Gutenberg blocks?
You need enough JSX to read and write the edit function — props, state via setAttributes, conditional rendering. You don’t need to know React deeply. The block editor components handle most of the complexity, so most blocks are just a few components wired together rather than custom React logic.
What is the difference between apiVersion 2 and 3?
apiVersion 3 (introduced in WordPress 6.3) moves the block wrapper element handling into the editor iframe rather than the main document, which isolates block styles better. It’s the current default from @wordpress/create-block. Use it unless you’re supporting older WordPress versions below 6.3.
Can I build a Gutenberg block without @wordpress/scripts?
Yes — you can write vanilla JavaScript with no build step and register it with wp_enqueue_script. This works for simple blocks but gets painful quickly because you lose JSX, modern JS syntax, and the import system. For anything beyond a trivial block, @wordpress/scripts is worth the setup time, which is about two minutes with create-block.
How do I add a block to a specific category or create my own category?
Set the category field in block.json to one of the built-in values: text, media, design, widgets, theme, or embed. To create a custom category, use the block_categories_all filter in PHP:
add_filter( 'block_categories_all', function( array $categories ): array {
    return array_merge( $categories, [
        [
            'slug'  => 'my-plugin',
            'title' => 'My Plugin',
            'icon'  => null,
        ],
    ] );
} );How do I check if a block is rendering correctly on the front end?
Add the block to a post, publish it, then view the post while logged out. The front end always loads the compiled style-index.css and the PHP render output — not the editor version. If something looks wrong on the front end but correct in the editor, check that save.js and your PHP render callback are producing the same class names and structure.
WordPress users face a critical decision that directly impacts their website’s success: choosing between Elementor and Gutenberg for content creation. This comprehensive comparison reveals which page builder delivers superior performance, functionality, and value for your business needs.
The WordPress Page Builder Revolution: Why Your Choice Matters
The digital landscape demands websites that convert visitors into customers. With over 43% of all websites powered by WordPress, selecting the right page builder has become increasingly crucial for business success. Both Elementor and Gutenberg offer unique advantages, yet each serves different user needs and technical requirements.
Modern website owners require tools that balance ease-of-use with powerful customization capabilities. Furthermore, search engines prioritize fast-loading, mobile-responsive sites with excellent user experience. Therefore, understanding the strengths and limitations of each platform directly impacts your website’s performance and profitability.
Elementor: The Visual Design Powerhouse
Elementor revolutionized WordPress page building by introducing drag-and-drop functionality that rivals premium design software. This third-party plugin transforms content creation through its intuitive visual interface and extensive widget library.
Key Elementor Advantages
Advanced Design Capabilities: Elementor offers over 90 widgets and 300+ pre-designed templates, enabling users to create professional layouts without coding knowledge. Additionally, the platform provides pixel-perfect design control through its advanced styling options and custom CSS integration.
Professional Templates and Blocks: The Elementor Template Library contains thousands of professionally designed sections, pages, and complete website kits. These templates significantly reduce development time while maintaining high design standards.
Third-Party Integrations: Elementor seamlessly connects with popular marketing tools, including Mailchimp, WooCommerce, and various CRM platforms. This integration capability streamlines business workflows and enhances website functionality.
Elementor Limitations
Performance Impact: Heavy reliance on JavaScript and CSS can slow page loading times, particularly on shared hosting environments. Studies show that Elementor-built pages average 15-20% slower load times compared to native WordPress blocks.
Vendor Lock-in: Switching from Elementor requires significant content migration efforts, as removing the plugin can break page layouts and formatting.
Gutenberg: WordPress’s Native Block Editor
Gutenberg represents WordPress’s evolution toward modern content creation through its block-based approach. Integrated directly into WordPress core since version 5.0, Gutenberg eliminates the need for third-party page builders.
Key Gutenberg Advantages
Native Performance: As WordPress’s default editor, Gutenberg generates cleaner code and faster loading speeds. Websites built with Gutenberg blocks typically achieve 25-30% better Core Web Vitals scores compared to page builder alternatives.
No Plugin Dependencies: Gutenberg’s integration into WordPress core ensures long-term stability and eliminates plugin compatibility concerns. This native approach reduces maintenance overhead and security vulnerabilities.
Growing Block Ecosystem: The WordPress community continuously develops new blocks and patterns, expanding Gutenberg’s functionality without performance penalties.
Gutenberg Limitations
Learning Curve: Users transitioning from classic editors may find the block-based approach initially challenging. However, this learning investment pays dividends through improved content structure and SEO optimization.
Limited Advanced Styling: While Gutenberg offers basic design options, it lacks Elementor’s sophisticated styling controls and animation capabilities.
Head-to-Head Comparison: 10 Critical Factors
1. Ease of Use
Winner: Elementor Elementor’s drag-and-drop interface provides immediate visual feedback, making it ideal for designers and non-technical users. Conversely, Gutenberg requires understanding block relationships and hierarchies.
2. Performance and Speed
Winner: Gutenberg Native WordPress integration gives Gutenberg significant performance advantages. Elementor’s additional JavaScript and CSS files can impact site speed, particularly on budget hosting plans.
3. Design Flexibility
Winner: Elementor Elementor offers superior design control with advanced typography, spacing, and animation options. Gutenberg’s design capabilities, while improving, remain more limited.
4. Cost Consideration
Winner: Gutenberg Gutenberg is completely free as part of WordPress core. Elementor Pro requires annual subscriptions starting at $49 for single sites.
5. SEO Optimization
Winner: Gutenberg Cleaner code output and better Core Web Vitals performance give Gutenberg an SEO advantage. However, both platforms can achieve excellent search rankings with proper optimization.
6. Mobile Responsiveness
Winner: Tie Both platforms provide excellent mobile optimization, though Elementor offers more granular responsive controls.
7. Learning Resources
Winner: Elementor Elementor’s extensive documentation, video tutorials, and community resources make it easier for beginners to master quickly.
8. Long-term Viability
Winner: Gutenberg As WordPress’s native solution, Gutenberg ensures future compatibility and continued development support.
9. E-commerce Integration
Winner: Elementor Superior WooCommerce integration and product display options make Elementor the preferred choice for online stores.
10. Developer Friendliness
Winner: Gutenberg Gutenberg’s React-based architecture and hook system provide better customization opportunities for developers.
Frequently Asked Questions
Can I switch from Elementor to Gutenberg? Yes, though the process requires careful planning. Content created with Elementor widgets must be manually recreated using Gutenberg blocks, as the shortcodes become non-functional when Elementor is deactivated.
Which platform is better for beginners? Elementor typically proves easier for complete beginners due to its visual drag-and-drop interface. However, Gutenberg’s simpler block system may be less overwhelming for content-focused users.
Do I need Elementor Pro for professional websites? While Elementor’s free version offers substantial functionality, professional features like theme building, popup creation, and advanced widgets require the Pro subscription.
How does each platform affect website speed? Gutenberg generally produces faster-loading websites due to cleaner code output. Elementor sites can achieve good speeds with proper optimization and quality hosting.
Which platform offers better SEO capabilities? Both platforms can achieve excellent SEO results. Gutenberg’s cleaner code structure provides slight technical advantages, while Elementor’s design flexibility can enhance user engagement metrics.
Making the Right Choice for Your Business
Your decision between Elementor and Gutenberg should align with specific business objectives and technical requirements. Choose Elementor if you prioritize advanced design capabilities, have budget for premium features, and value extensive customization options.
Select Gutenberg if you emphasize website performance, prefer native WordPress solutions, and focus primarily on content creation rather than complex designs. Additionally, Gutenberg suits businesses planning long-term WordPress usage without platform switching concerns.
Consider hybrid approaches where appropriate. Many successful websites use Gutenberg for content pages while implementing Elementor for specialized landing pages or complex layouts.
Conclusion: The Verdict for 2025 and Beyond
The Elementor vs Gutenberg debate ultimately depends on individual needs rather than universal superiority. Elementor excels in design flexibility and user-friendliness, making it ideal for agencies, designers, and businesses requiring sophisticated layouts. Meanwhile, Gutenberg offers superior performance, cost-effectiveness, and long-term stability for content-focused websites.
WordPress’s continued investment in Gutenberg development suggests a bright future for the native editor. However, Elementor’s market leadership and extensive ecosystem ensure its relevance for design-centric users.
Success with either platform requires understanding their strengths and optimizing accordingly. Focus on creating valuable content, maintaining fast loading speeds, and delivering excellent user experiences regardless of your chosen tool.
The best page builder is the one that helps you achieve your business goals efficiently while providing the flexibility to grow and adapt. Make your decision based on current needs while considering future requirements and resource availability.
In a WordPress settings page 3rd-party developers can inject their own settings fields / HTML with action hooks, but you cannot do the same if you decide to build your plugin’s settings page in React.
This article explores the options to make our React Components extendible such that 3rd-party developers can easily inject their own components in them.
We are going to use SlotFillProvider, Slot, Fill and PluginArea Gutenberg React Components.
Part 1: Building a simple settings page
We’re going to build a very simple settings page. For the sake of simplicity of this article, we won’t complicate it by writing any server-side logic to save the fields, nor will cover managing the state of our application because our focus is just rendering our components and allowing other developers to render their own components.
So, we will create an AdminSettings Component that renders First Name, Last Name text fields and a Save button.
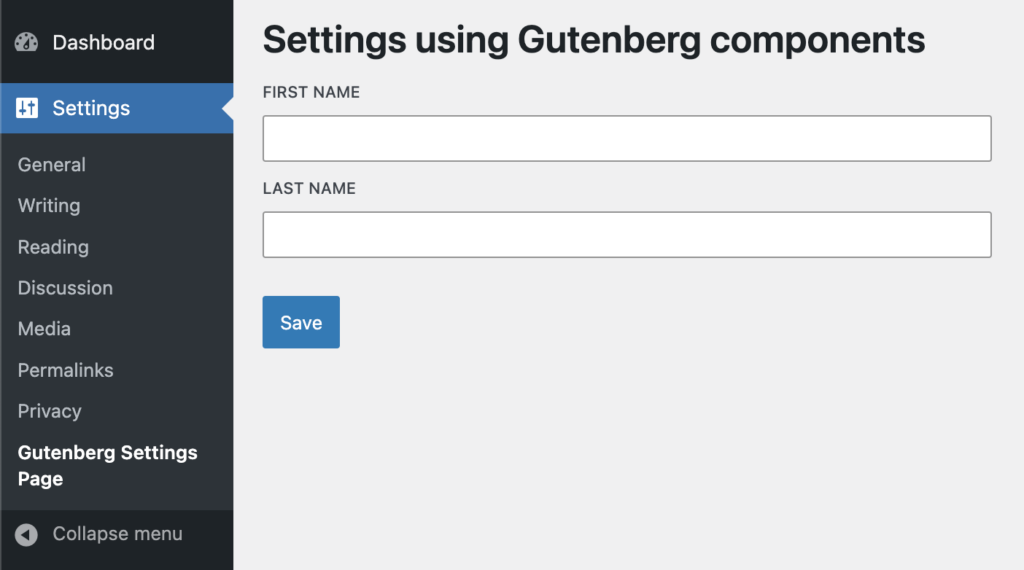
import { __ } from '@wordpress/i18n';
import {
    BaseControl,
    TextControl,
    Button,
} from '@wordpress/components';

export const AdminSettings = () => {
    return (
        <>
            <h1>{ __( 'Settings using Gutenberg components' ) }h1>

            <BaseControl label={ __( 'First Name' ) }>
                <TextControl/>
            BaseControl>

            <BaseControl label={ __( 'Last Name' ) }>
                <TextControl/>
            BaseControl>

            <br />

            <Button variant='primary'>
                { __( 'Save' ) }
            Button>

    );
};
Understanding Slot and Fill Components
If we were to compare the behavior with the PHP hooks, the I’d say Slot is similar to what do_action() does and Fill is similar to add_action().
As a plugin developer, you usually provide both the Slot and Fill. 3rd-party developers will inject their Components in this Slot using Fills. But we will do it differently. Instead of relying on other developers to implement Fills, we will expose a component on the global window object that implement Fills.
A Slot and a Fill is connected through the name attribute. For example:
<Slot name="additional-fields-area"/>
<Fill name="additional-fields-area">
    <TextControl label="Injected field"/>
Fill>
They are only connected if both share the same value for the name attribute.
Understanding SlotFillProvider
SlotFillProvider is a Context provider for Slot and Fill. When you’re using Slot-Fill, you must ensure that both Slot and Fill are inside the SlotFillProvider, else it won’t work.
When you’re building an extendible Gutenberg block, you don’t need to use SlotFillProvider because the entire Gutenberg editor Component is already inside it. But if you’re building an extendible component which will be used outside of the Gutenberg editor, then you must use it.
Understanding how Fill works
As long as Fill is inside the SlotFillProvider, you can render it anywhere, it doesn’t matter. Whatever is between the Fill open and close tags will always be rendered where the connected Slot is.
The SlotFill mechanism is built using React Portals.
Part 2: Adding a Slot to our Settings Component
import { __ } from '@wordpress/i18n';
import { PluginArea } from '@wordpress/plugins';
import {
    BaseControl,
    TextControl,
    Button,
    SlotFillProvider,
    Slot
} from '@wordpress/components';

export const AdminSettings = () => {
    return (
        <SlotFillProvider>
            <h1>{ __( 'Settings using Gutenberg components' ) }h1>

            <BaseControl label={ __( 'First Name' ) }>
                <TextControl/>
            BaseControl>

            <BaseControl label={ __( 'Last Name' ) }>
                <TextControl/>
            BaseControl>

            <Slot name="gutenberg-settings-additional-fields" />

            <br />
            <Button variant='primary'>
                { __( 'Save' ) }
            Button>
        SlotFillProvider>
    );
};
Great! We’re already halfway into building an extendible component.
Now remember I said in the previous point – Fill has to be inside the SlotFillProvider for this to work. You might wonder, how can 3rd-party developers add a Fill here? This will be explained next.
Revising registerPlugin
Gutenberg editor provides a number of SlotFills to allow developers to inject their Components in specific areas of the editor. You may have already used some of them already. If you remember, you may have done something like:
import { registerPlugin } from '@wordpress/plugins';
import { __ } from '@wordpress/i18n';
import { PluginPostPublishPanel } from '@wordpress/editor';

registerPlugin( 'third-party-plugin', {
    render: InjectSomeText,
} );

function InjectSomeText() {
    return (
        <PluginPostPublishPanel>
            <p>Post Publish Panelp>
        PluginPostPublishPanel>
    );
}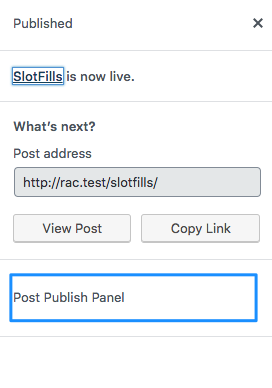
Gutenberg provides the following SlotFills:
- MainDashboardButton
- PluginBlockSettingsMenuItem
- PluginDocumentSettingPanel
- PluginMoreMenuItem
- PluginPostPublishPanel
- PluginPostStatusInfo
- PluginPrePublishPanel
- PluginSidebar
- PluginSidebarMoreMenuItem
If InjectSomeText does not return at least one of these, then whatever the component returns won’t be rendered anywhere. So it is clear – The Components rendered by registerPlugin must return at least one of the above.
But why is that? Why does registerPlugin refuse to render a Component that does not return one of the core SlotFills?
This is because, the core SlotFills return Fill components that are connected to the pre-defined Slot areas. And these Fill components are rendered inside PluginArea components.
Understanding PluginArea
The registerPlugin function is very closely related to the PluginArea component and they work together. Let’s try to understand it with a practical example.
import { __ } from '@wordpress/i18n';
import {
    BaseControl,
    TextControl,
    Button,
    SlotFillProvider,
    Slot,
    Fill
} from '@wordpress/components';

export const AdminSettings = () => {
    return (
        <SlotFillProvider>
            <h1>{ __( 'Settings using Gutenberg components' ) }h1>

            <BaseControl label={ __( 'First Name' ) }>
                <TextControl/>
            BaseControl>

            <BaseControl label={ __( 'Last Name' ) }>
                <TextControl/>
            BaseControl>

            <Slot name="gutenberg-settings-additional-fields" />

            <br />

            <Button variant='primary'>
                { __( 'Save' ) }
            Button>
        SlotFillProvider>
    );
};

window.PluginGutenbergSettingsFields = ( { children } ) => {
    return (
        <>
            <Fill name="gutenberg-settings-additional-fields">
                { children }
            Fill>

    );
};
Similar to how core provides us with a list of SlotFills, we created a custom SlotFill Component called PluginGutenbergSettingsFields and exposed it on the global window object, so that other developers can easily use it with registerPlugin.
But you might wonder, wait! Didn’t I mention previously that Fill should be inside the same SlotFillProvider ? If other 3rd-party developers use PluginGutenbergSettingsFields to inject code, where would it be rendered? – That’s a good question!
This is where, PluginArea is important!
import { __ } from '@wordpress/i18n';
import { PluginArea } from '@wordpress/plugins';
import {
    BaseControl,
    TextControl,
    Button,
    SlotFillProvider,
    Slot,
    Fill
} from '@wordpress/components';

export const AdminSettings = () => {
    return (
        <SlotFillProvider>
            <h1>{ __( 'Settings using Gutenberg components' ) }h1>

            <BaseControl label={ __( 'First Name' ) }>
                <TextControl/>
            BaseControl>

            <BaseControl label={ __( 'Last Name' ) }>
                <TextControl/>
            BaseControl>

            <Slot name="gutenberg-settings-additional-fields" />

            <PluginArea/>

            <br />

            <Button variant='primary'>
                { __( 'Save' ) }
            Button>
        SlotFillProvider>
    );
};

window.PluginGutenbergSettingsFields = ( { children } ) => {
    return (
        <>
            <Fill name="gutenberg-settings-additional-fields">
                { children }
            Fill>

    );
};
I will explain the entire flow in the next section.
Part 3: Extending as a 3rd-party developer
As a 3rd-party developer, I would like to add a ToggleControl Component to the settings page.
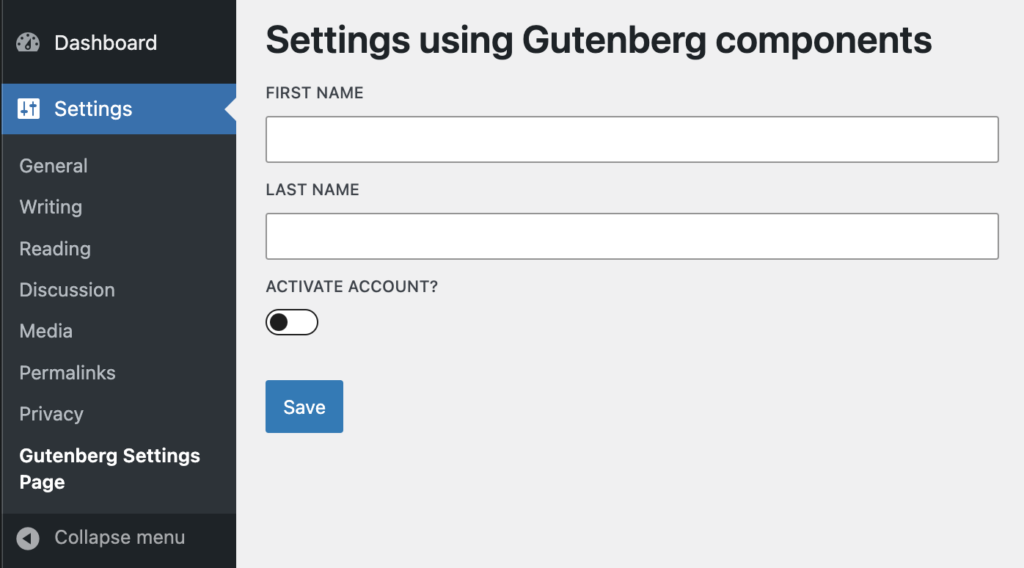
mport { registerPlugin } from '@wordpress/plugins';
import { __ } from '@wordpress/i18n';
import {
    BaseControl,
    ToggleControl
} from '@wordpress/components';

const { PluginGutenbergSettingsFields } = window;

registerPlugin( 'third-party-plugin', {
    render: InjectAdditionalFields,
    scope: PluginGutenbergSettingsFields.scope // Ignore this for now.
} );

function InjectAdditionalFields() {
    return (
        <PluginGutenbergSettingsFields>
            <BaseControl label={ __( 'Activate Account?' ) }>
                <ToggleControl/>
            BaseControl>
        PluginGutenbergSettingsFields>
    );
}
Summary:
– registerPlugin renders InjectAdditionalFields where the PluginArea component is.
– PluginArea renders a hidden div which renders the contents of InjectAdditionalFields.
– InjectAdditionalFields returns our custom SlotFill PluginGutenbergSettingsFields.
– PluginGutenbergSettingsFields renders Fill next to the Slot and also inside the same SlotFillProvider
– Slot with the help of SlotFillProvider renders content that is between the Fill tags.
Extra: Exposing application data to 3rd party components
Obviously, the Toggle Field will require access to the AdminSettings state data. For example, if you want to make the Toggle Field conditional depending on the value of some other field?
Slot component accepts a prop called as fillProps. This is how you do it:
But to access this data, AdminSettings, PluginGutenbergSettingsFields and InjectAdditionalFields needs to be updated like the following:
import { useState } from '@wordpress/element';

export const AdminSettings = () => {

    const [ appData, setAppData ] = useState( { fname: 'Siddharth', lname: 'Thevaril' } );

    return (
        <SlotFillProvider>
            <h1>{ __( 'Settings using Gutenberg components' ) }h1>

            <BaseControl label={ __( 'First Name' ) }>
                <TextControl value={ appData.fname }/>
            BaseControl>

            <BaseControl label={ __( 'Last Name' ) }>
                <TextControl value={ appData.lname }/>
            BaseControl>

            <Slot name="gutenberg-settings-additional-fields" fillProps={ { appData, setAppData } } />

            <PluginArea />

            <br />

            <Button variant='primary'>
                { __( 'Save' ) }
            Button>
        SlotFillProvider>
    );
};

window.PluginGutenbergSettingsFields = ( { children } ) => {
    return (
        <>
            <Fill name="gutenberg-settings-additional-fields">
                { ( fillProps ) => children( fillProps ) }
            Fill>

    );
};
And for the plugin:
function InjectAdditionalFields() {
    return (
        <PluginGutenbergSettingsFields>
            {
                ( fillProps ) => {
                    return (
                        <BaseControl label={ __( 'Activate Account?' ) }>
                            <ToggleControl />
                        BaseControl>
                    )
                }
            }
        PluginGutenbergSettingsFields>
    );
}
If your settings page is large and the app data is complex, I would suggest to implement a separate data store instead of passing app state via fillProps.